Nginx 403 Forbidden Error The Definitive Quick Fix Guide To Restore Access And Security
Understanding What the 403 Error Actually Means in Nginx
A 403 error from Nginx means the server understood your request but is deliberately refusing to fulfill it. This is fundamentally different from a 404, which signals that the requested resource does not exist. With a 403, the server is saying "I know exactly what you want, and I have the authority to deny it." That distinction matters because it immediately narrows your troubleshooting scope down to access controls, file permissions, and server configuration rather than broken links or missing directories. The most common trigger is straightforward: Nginx does not have read or execute permissions on the directory or file you are trying to serve. Linux file permissions operate on a three-tier model — owner, group, and others — and Nginx typically runs under the www-data or nginx user account depending on your distribution. If those permissions are set too restrictively, the web server cannot read your content and returns a 403 instead of serving the page.
The Most Common Fix: Correcting Directory and File Permissions
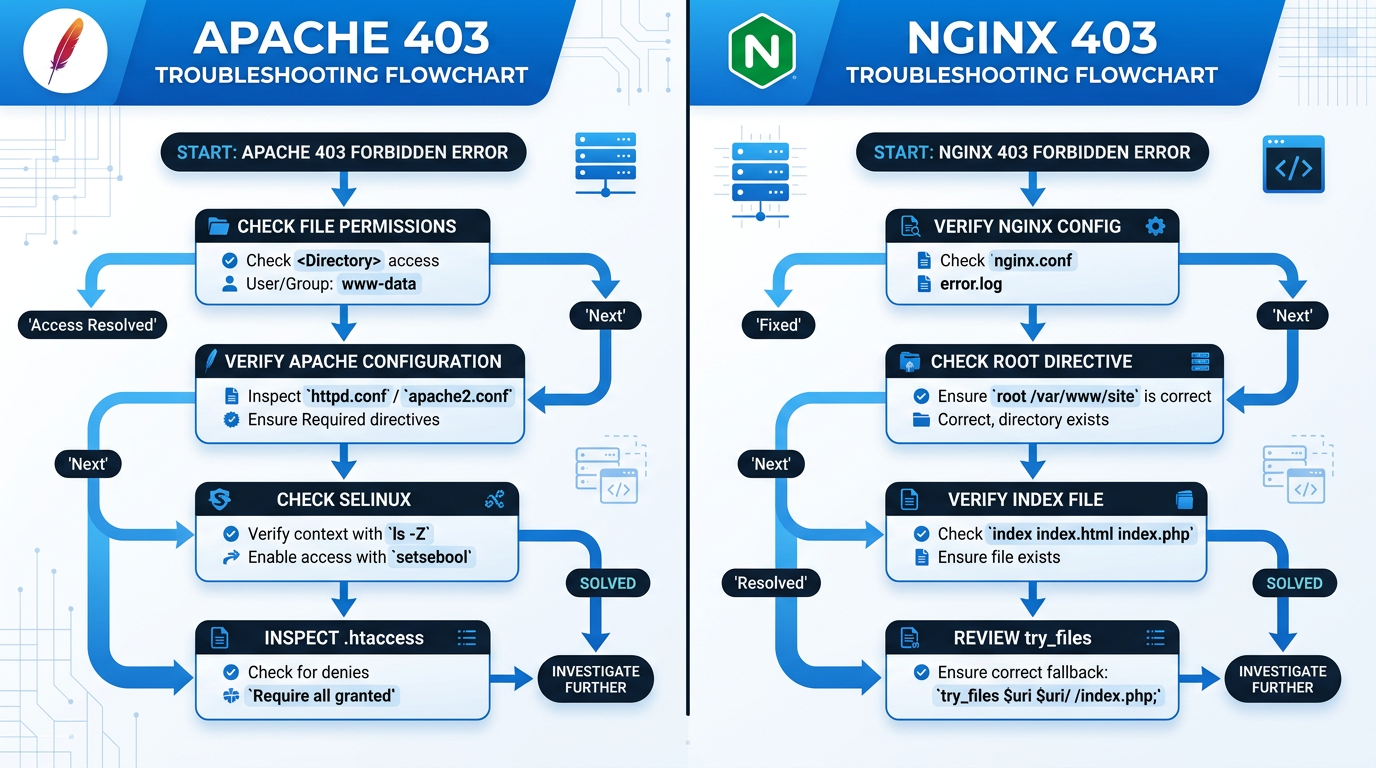
This is where the majority of 403 errors get resolved, and it usually takes only a couple of commands. The baseline permissions that work for most Nginx setups are 755 for directories and 644 for files. Directory permissions need to include the execute bit because without it, Nginx cannot traverse into the folder even if it has read access. File permissions do not need execute because web servers read content, they do not run regular files. Replace www-data with nginx if you are running CentOS, RHEL, or Fedora. The ownership step ensures the user that Nginx operates as can access the files. Skipping this step is what caused me to lose two hours on a production server a few years ago — permissions were set correctly at 755 and 644, but the files were owned by root with group set to staff, so Nginx had zero access even though the numeric permissions looked fine. After adjusting permissions, reload the Nginx configuration without restarting the entire service. A full restart is unnecessary and causes brief downtime. The command is clean and fast:
sudo nginx -t
sudo systemctl reload nginx
Index Directive Problems — When Nginx Cannot Find a Default File
Another frequent cause of 403 is the absence of an index file that Nginx expects. When a visitor requests a directory rather than a specific file, Nginx looks for the file names listed in the index directive. The default configuration includes index.html, index.php, and a few others. If none of those files exist in the requested directory, Nginx returns 403 rather than listing the directory contents, provided that autoindex is disabled. This is the situation that trips up developers most often. You upload your site files into /var/www/html but name your main page index.htm instead of index.html. Nginx never finds index.html, the directory listing is disabled for security, and you receive a 403 with no clear indication of what went wrong. The fix is either to rename your file to match the expected index directive or to add your custom filename to the index list in the server block configuration.
Get the Full Details
index index.html index.htm index.php;Placing this line inside the location or server block tells Nginx what files to look for when a directory is requested. After modifying the configuration, always test it with nginx -t before reloading. Sometimes a 403 disappears and is replaced by a full directory listing. This happens when someone sets autoindex on in the Nginx configuration. Directory listing exposes every file and folder structure to anyone who visits the site, which is a significant security vulnerability. Attackers can use it to map your application, discover backup files, and identify sensitive endpoints that were never meant to be public. The explicit disabling shown above is the safe default. If you find autoindex turned on and you did not intentionally enable it, check your configuration history or recent deployments. A misconfigured container or a CI/CD pipeline override is usually the culprit. Removing the autoindex directive entirely also reverts Nginx to its default behavior of returning 403 when no index file is present.
This is the edge case that most guides completely skip, and it is the one that costs people the most time. Linux security modules like SELinux and AppArmor sit on top of standard Unix permissions and can block Nginx from accessing files even when chmod and chown are perfectly configured. Ubuntu ships with AppArmor by default. RHEL, CentOS, and Fedora ship with SELinux. If you are on either of those platforms and standard permission fixes did not resolve the 403, this is almost certainly what is happening. With SELinux, the context labels on your web directories determine whether Nginx can read them. The default context for web content is httpd_sys_content_t. If your documents live in a non-standard location outside /var/www/, they will not automatically receive that context. I spent an entire afternoon chasing a 403 on a CentOS server where the website was hosted in /srv/web/myapp instead of the default document root. Permissions were correct. SELinux was blocking the request silently.
sudo semanage fcontext -a -t httpd_sys_content_t "/srv/web/myapp(/.*)?"
sudo restorecon -Rv /srv/web/myapp
The first command adds the correct SELinux context rule for the new path. The second command applies it recursively to all existing files. Without those steps, Nginx receives a 403 regardless of what chmod reports. You can verify the current context with ls -Z and check the audit logs with sudo ausearch -m avc -ts recent if you need to confirm that SELinux is the source of the denial. AppArmor works differently. It uses profiles rather than context labels. The Nginx profile on Ubuntu typically restricts file access to specific paths. If your content is stored outside those paths, the AppArmor profile will deny the request. Check the status with sudo aa-status and review the Nginx profile at /etc/apparmor.d/usr.sbin.nginx. Adjustments to AppArmor profiles require more care than SELinux context changes because a misconfigured profile can break the entire web server. I recommend using the --gen-profile flag to generate a new profile from observed behavior rather than editing an existing one by hand.

Custom Error Pages and Logging — Diagnosing When the Cause Is Not Obvious
When the standard fixes do not apply, the next step is to look at the error logs. Nginx error logs contain the exact reason for the 403 denial. The log location varies by distribution but is commonly found at /var/log/nginx/error.log or /var/log/nginx/error.log.1. A typical entry looks like this: The Permission denied message combined with the open() function points directly to a filesystem access problem. If the log instead shows access forbidden by rule, that indicates an Nginx configuration directive such as deny, allow, or satisfy is actively blocking the request. If the log is empty, the 403 may be coming from an upstream server or a proxy layer rather than Nginx itself, which means the problem is not in the Nginx configuration at all. Custom error pages can also mask the real issue. If you have a custom 403 error page configured, the browser displays your nice-looking error template, but the underlying cause is hidden from the visitor and from anyone not checking the logs. Remove custom error_page directives temporarily during troubleshooting to see the raw Nginx response, which includes more diagnostic information in the headers.
Restrictive Location Blocks and Access Controls
Nginx location blocks can deny access based on IP address, authentication requirements, or conditional expressions. A configuration like the one below will return 403 to anyone who is not explicitly allowed: This pattern is legitimate security practice for restricting administrative panels. The problem arises when the allow list is configured incorrectly or when a recent IP change places the administrator outside the permitted ranges. A developer working from a home network with a dynamic IP will hit a 403 and have no idea why, especially if the configuration was written months ago and the allow rules were never updated. Another variation involves auth_basic and auth_basic_user_file directives. If basic authentication is enabled on a location block and the credentials are wrong or missing, Nginx returns 403 rather than prompting for credentials in some proxy configurations. This behavior depends on how the error is handled by the proxy or reverse proxy layer in front of Nginx. Checking the authorization configuration in your location blocks is a quick step that catches this scenario.
The Complete Step-by-Step Resolution Sequence
Following a structured sequence prevents wasted time and keeps your troubleshooting logical. Start with the simplest checks and move toward the more complex ones only when earlier steps do not resolve the issue. First, check the Nginx error log for the specific denial reason. The log entry will tell you whether the problem is a permission issue, a configuration directive, or something else entirely. Second, verify the file and directory permissions using the chmod values already described. Third, confirm the ownership is correct for the Nginx user. Fourth, check that an appropriate index file exists in the requested directory. Fifth, ensure autoindex is disabled unless you intentionally need directory listing. Sixth, review SELinux contexts if you are on an SELinux-enabled system. Seventh, inspect AppArmor profiles if you are on an AppArmor-enabled system. Eighth, examine your location blocks for restrictive access controls. Each step takes under a minute except for the SELinux and AppArmor investigations, which can take longer depending on how unfamiliar you are with those security modules. Following this sequence resolves the vast majority of 403 errors without requiring you to dig into complex configurations or restart services unnecessarily.

What This Guide Does Not Cover
A 403 error from Nginx can occasionally originate from a upstream application server, a load balancer, or a CDN layer rather than Nginx itself. If you are running Nginx in front of a backend application, the 403 may be generated by the application framework before the response ever reaches Nginx. In that scenario, checking the backend application logs is necessary. Similarly, if you are behind a cloud provider's firewall or a Web Application Firewall, those systems can return 403 responses independently of Nginx. The diagnostic approach for those situations is completely different and requires inspecting the infrastructure layer rather than the web server configuration. This guide focuses on the cases where Nginx is the source of the 403 response, which covers the overwhelming majority of situations that users encounter in practice.